-
Lets work together
Onsite or Remote Support
-
M-F 9:00 am - 5:00 pm
Call (519) 573-3759
Using PowerShell to Bulk Import AD Users
What you will need:
• PowerShell Active Directory Module loaded – The script I provide will load the module you just need to run it from a computer that has RSAT tools installed or the AD role.
• Rights to create users accounts in Active Directory
• CSV File (See below)
• PowerShell Script (See below)
Step 1: Setup the CSV file
A basic CSV file should have the following headers. Technically you can import new accounts with just the SamAccountName, Name, and the password column but that is not recommended.
• SamAccountName = this will be the users logon name
• password = users password. Make sure it meets your password requirements.
• path = OU where you want to import users to. This is the distinguished name of the OU. If you leave it blank it will import into the default users container.
• GivenName = First name
• Surname = Last name
• Name = Name
• DisplayName = Display Name
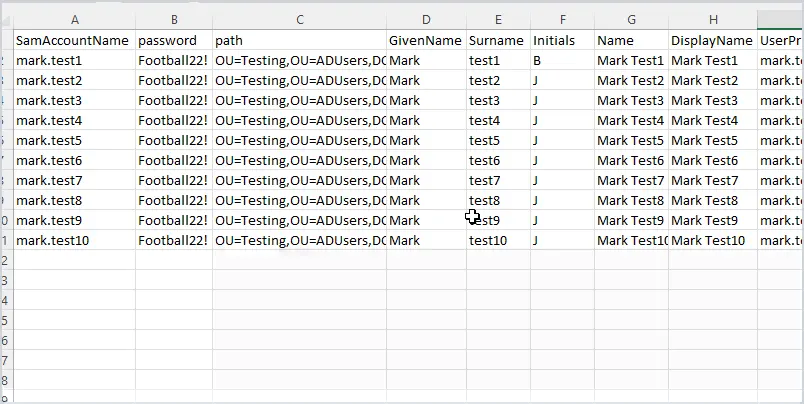
Above is an example of my CSV file. You can download it here which includes 21 user fields that can be set during the import.
How do you find the OU path?
The OU path is the distinguishedName attribute, to find this open up Active Directory Users and Computers and browse to the OU you want to import to, then right click and select properties then select attribute editor.
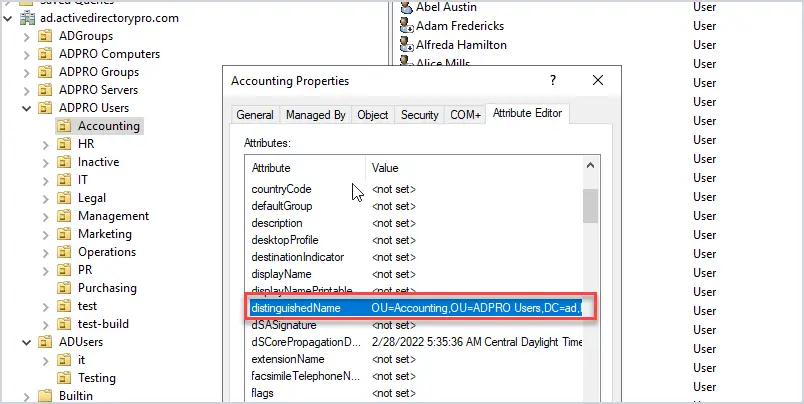
Copy the path into the path column in the CSV file.
At this point the CSV file has the required fields, you can jump to step 2 (setting up the PowerShell script) or keep reading to configure optional fields for user accounts.
Add additional user fields to the CSV file.
You may want to include some additional user fields in the CSV. Just know that whatever columns you add to the CSV you will also need to include them in the PowerShell script.
I’ve included several common user fields in the CSV template and PowerShell script.
- UserPrincipalName
- Department
- Description
- Office
- OfficePhone
- EmailAddress
- StreetAddress
- POBox
- City
- State
- PostalCode
- Title
- Company
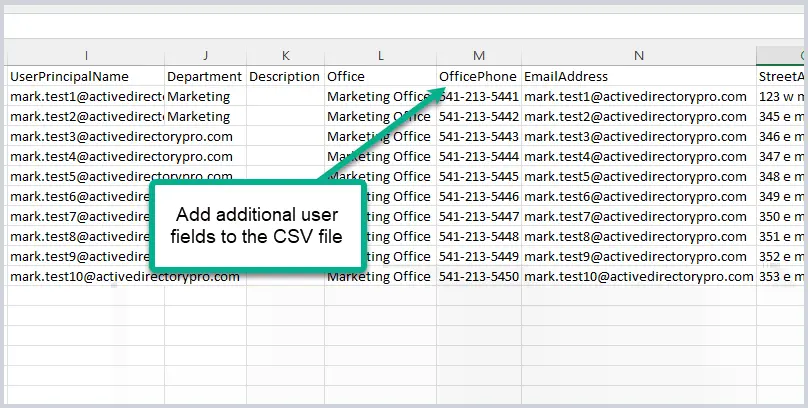
To add more I recommend looking at the PowerShell new-aduser cmdlet to see which parameters are supported.
I like to keep the name of the headers the same as the new-aduser parameters, it makes it easier to troubleshoot.
At this point, you should have a CSV file configured, save the file to your local computer.
Step 2: Configure the PowerShell Script
- Below is the script to bulk import new users.
- You will need to modify the path to the CSV file you saved from step 1 (unless it matches what I have in the script c:\it\bulk_import.csv)
- By default, the script sets the accounts to enable. You can change this by setting Enabled to false
- By default, the script sets the accounts to change password at the next logon. To change this set “ChangePasswordAtlogon to false.
Step 3: Run the PowerShell Script to import the accounts
At this point, the CSV file should be setup with the user’s information and the Powershell script should be modified (if needed)
Now it’s time to execute the script.
Now check Active Directory to verify the accounts imported.
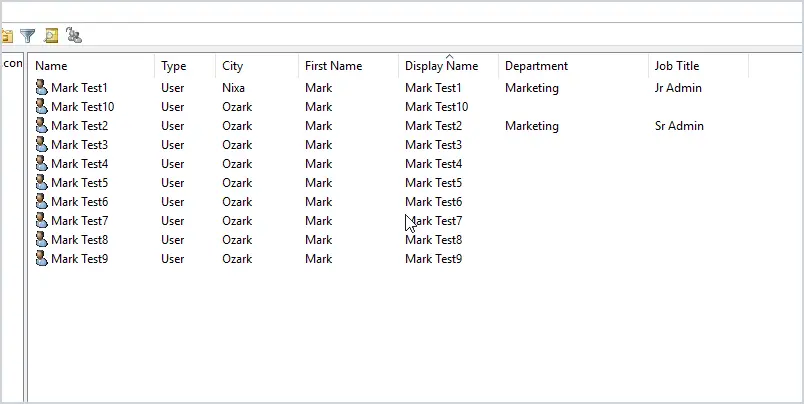
Yes, it was a success, you can now use this script anytime to automate creating one or many AD user accounts. It’s a huge time saver.